jambaloney here - yes i know it has been a long while since i posted - i have been pretty busy with work, still i did manage to get our quick- and dirty shed built in october and novemenber.
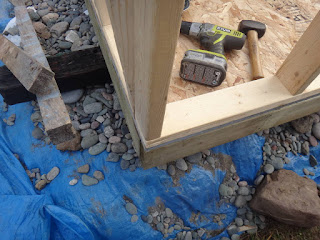
first off - down to the beach to get rocks to make a base - i put these on plastic for weather barrier - i used an atv ramp for the wheelbarrow - it was a bit steep..
so i lessened each load - 4 trips did the trick.
for the base i didn't skimp - all pt lumber..
i pre-set screws at 16" intervals along the 2x12s as pilot screws, i used the compressor to add 2 nails to on either side when together...
i used some free creosote 4x6s as runners on the rocks (on an old tarp)
so here is the flooring deck
and then a floor!!!!
i also bought all new lumber for the frames..
and here are all the frames made, i used the floor as a large workbench!!
compressor came in handy but it died after the frames were done,,,
another angle of the frames - the shed is 8x12 feet - anything over 100 square foot floor area requires a building permit.
after some fiddling around, here are 2 frames braced together...
and squared off at the base - before...
and after!
here is another angle...
as i only have 96 sq feet of floor space, i decided to "go up" so one length is 8 feet high, the other 10, this save on cuts, - i couldn't heave the 10 foot high wall frame up without it slipping ( i am only 5' 7") so i tacked a board on the floor to use as a brace...
hurrrah - 4 sorta-walls!
next was the Simpson hurricane ties that i use for rafters - it allows me to cheat and avoid cutting notches to seat them flush on the frames...
here is a good look with them in place ....
now to cut the rafters....
i square them all off at once
then clamp them to mark for cutting and placement in the hurricane ties
my new saw i love - 12" sliding miter - 2 at a time!!!
these blocks are for the ends and the hurricane ties won't work there..
i marked the square ends
you can see the blocks at the top here on the ends - i screwed the rafters into them and put plates on the outside..
black plastic vapor barrier...
and walls - missing a few interim pics - i was in a rush -
ed - i DID have 6 old pieces of plywood for walls so some of this was scrounged!!!
but the end wall here is osb ..
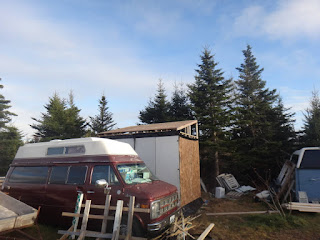
hiding behind vandura...
well the rest i built without photos - i got it done just in time... the roofing is a new favorite of mine, osb covered with 6 mil plastic covered with a tarp - 2 hr installation, good for 5 years , 20 bucks. i re-roofed the sheds on the north side of the manor this way too. all buildings are "supposed" to be temporary, but this shed might stay in which case it will get siding and a metal roof one day,
i covered the NE wall in plastic and slapped a crappy old door on there - this lets a lot of light in - the side is most protected form the wind..
it may look like crap but it stores a LOT. we got the furniture out on the attic that was in the way of everything and stored a bunch of other stuff that was in out way out there... the corridor is just the right size and since then our living and working areas are noticeably better!!
for sandy - last day of the season trout - aug 31, 2015..
and for pioneer P - a week before the end of the season i got this beauty - best colours of the year!
just spent the last 2 days shoveling snow and am looking forward to another dumping on saturday - i am beat - hope you are all surviving winter!!
cheers!!


I plan on asking for a sliding miter saw for my birthday this year, or perhaps Santa if that doesn't work. My current one works well but only up to 8" for thin stuff and 6" for 2x material. A laser would also be nice.
ReplyDeleteThe shed looks nice. Someday, I have great plans to build one of those to relieve our garage of some of its contents but for now, it is still well down on the list. Someday....
hey ed !
Deletegiven your cabinet skills a shed will be a cakewalk for you!
i just got the saw this year - i have been using a circular saw until now - BIG improvement.
cheers pal!
Nice looking shed. Shame you have that 100 sq. foot rule I think I would be tempted to break it and tell em to shove off myself.
ReplyDeleteSo did you cut the rafter supports at an angle to fit in the hurricane supports? I can't quite see in the pics what your are saying.
PS - I took all the trout because well... you know...
I U'r troutses R belongs to Me.
hey pioneer p!
Deletei would break it but there is teh insurance issue if no proper permit... it seem big enough as is though!
no n0 cuts in teh rafters - teh hurricane ties take care of that it is the same kinda thing as joist hangers.
i figured you would - all yours i guess - season starts again april 15..
cheers!
Good work!
ReplyDeletethanks gorges - hope you are surviving winter!!!
DeleteShed looks good. Looks like the weather was in your favor while framing. Miter saws are the greatest, square or perfect angle cuts make any job a pleasure.
ReplyDeleteHaving weird weather this winter, 30f last few days and suppose to be 78f tomorrow. Heat on part of the week and A/C the next. At least I never worry about snow :-)
hey mike!
Deleteyeah - i had a few good days and banged it out - teh saw really did help!!!
no snow for you? we have extra - i\ll send you some!!!
cheers!
That is awesome. You almost make it look easy enough for me to someday try but I'll admit to not so great woodworking skills. Small things yes, but something like that, probably wouldn't come out as nice as yours, ha . Nice work!!
ReplyDeleteuh - it is pretty ugly ;-)
Deleteit wasn't a finesse job - i am sure you could get 'er done!
thanks and cheers!
Looks great Jam!
ReplyDeletethansk tb - it works!
Deleteall my best!
Nice one, J. Clever boy :)
ReplyDeletethanks dani - dunno about clever, more like desperate!!!
Deletecheers!
Great post..it helped us decide how to block our old woodshed that has a lean to it! Nice trout! Sigh!
ReplyDeletehey fiona!
Deleteglad you could get something out of it - blocking works - i have buttressed a lot of things here with cutoffs.
cheers!
Wow there's some good work there, how long did it take you to build all that?
ReplyDeletethanks kristi!
Deletegetting the rocks and all was a good portion of teh work - a shed roof makes thing easier - i would say 15-20 hours all told.
cheers!
Wow, good job. Must be so nice to have the extra storage. Especially when you home is small. every cm counts.
ReplyDelete