here is your sky pic helga:
this is the follow-up of the basement door post in which, you didn't really see a door ;-) first thing i had to do was reverse and oil the hinges...
i did splurge and buy a new lockable door knob - only $25!!
it wasn't too difficult to get that put in the door - almost all doors these days have a similar cut and pattern for knobs... nice though!!
the next task is to remove the old rotten sill - it is in bad shape...
now it's time to put the new sill in... i had to remove a pile of the pvc channels i put under the new sill (see last post) because the concrete was poured unevenly and i couldn't seat the new sill properly

cut out rotten wood..... and jiggle...
and wiggle ..
(you can see part of the old door still hanging off the old hinge.. i basically ripped it off the frame ;-)
level long...
level wide.......
and shim the crap out of it then use deck screws to anchor - new sill done!!
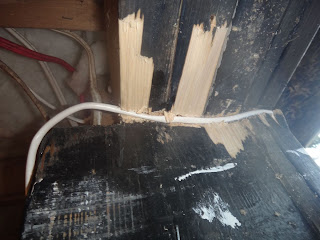
i had to drill out a channel for the phone cord that comes around the outside of the house into the basement... long worthless story behind THAT monstrosity - i will be fixing that later, but it is not part of this project so this ugly 3 minute solution is a must!
i pried out some boards that were uses to close out the old door - here is the empty outside... ready for the installation of the 'new' door!
i had to cut the bottom off the 'new' door... it is metal sheets with hard foam in the middle - i used a reciprocating saw with a metal blade...
which worked well of the top part, but the foam played havoc with the bottom cut.... i broke the blade too - next time, i will cut shallow and on an angle on one side, then flip the door and do the same on the other - trial and error...

i cleaned up the mess with tin snips...
and installed the door!! i measured several times so it fit nicely - i used a shim underneath to provide a little clearance and then screwed the hinges in place (no pic of shim, sorry)... when hanging doors always remember to install the top hinge first... when taking them down, remove the top hinge last... this way you won't get bonked by a falling door..
on the doorknob side, i used the board that i removed with the old door to provide a place for the striker plate...
more shims - this doorway isn't square!!!

last real chore is weather proofing - for the weather stripping i used sill foam and hurricane tape ( get some, it is tear proof and strong as can be) to make my own - i can't stand paying 10 bucks a door for weatherstripping!!
i cut strips, folded it over and taped it - this didn't work that well...
i ended up using just one thin strip with tape on both side and then used spray adhesive to put it in place - it worked pretty good, but next time i am going to use a better foam - probably strips cut from foam pipe insulators... you can see that i have filled all the other gaps with spray foam - i caulked the cracks on the outside with silicone.
here is the inside ( i also foamed the gaps down below - i want the water coming in through the channels)..
and here is the outside!! i am really happy i did this - last week was brutally cold and i was able to keep the basement from freezing without too much effort... we have our freezer, dishwasher, washing machine, all pipes and our pump down there... it CAN"T be allowed to freeze - this was a big help... plus it closes like a normal door and we can lock it when we leave. the window lets more light in during the day, we'll install a curtain for when we are gone.
here is your other pic helga!!
cheers all! hope you didn't fall asleep ;-)


