jambaloney here!
i did this project a couple of months ago - good winter project!
helga: this is grand river, on the way to st peter's
our bathroom is halfway between the old cottage and the new cottage (Framboise Manor is about 700 square feet, but made up of a tiny cottage with another tiny cottage tacked on)... the back half of the bathroom "sticks out" into the basement....
there is no "bottom up" support - it just hangs there and, yes, the back part of the bathroom is sagging downwards... you can see our current cold store - those are potatoes in the cardboard boxes with towels over them. the basement is about 3 deg C - perfect for cold storage... the arrangement leaves a bit to be desired..
so, 2 mints in one - i bought these slabs for support in the basement a while ago - this is the first step
the next step is to buttress these railway ties that hold up the whole floor in the older cottage on a couple of phone poles... it works, but help is needed, just not today...
i cleared out all the stuff in the cold storage area
you can see the uneven crawl space - a nightmare to insulate and get under...
vapor barrier and pipes and wires... and spiders ;-))
along the NE wall is wiring for the hot tub and the heater in the bathroom... plus boards that were used to pour the foundation that were never removed - a real moisture and rot magnet - they have to go pronto!!
SPECIAL ADDED BONUS!!!!! there is concrete that never set and seeped out where the boards were - foundation alert!!
another looksee..
NEVER let this happen to you - rotten boards out!!
well, i'll use a couple for the cold store - the dry bits anyway..
emergency repair - i filled in the gap with rocks and gravel..
- and then buttressed it with more gravel - it hasn't collapsed yet and this will keep it from doing so until i can fix it properly...it the foundation starts to sag now, it will bite down on stone instead of air.
looks better now!
there is a lot of extra gravel - i need it for the basement steps so out it goes!!!
special added bonus #2 - i did more work on the steps into the basement!!!
back to the cold storage - i cut out a square area in the crawl space
and lined it with gravel!!
stay tuned for part 2 - night everyone!
and cheers as always!
(Edited by Rip Van Winkle (also known as kymber) - jeez louise - has it really been a month since i posted anything?!?!?! i think it has just been a long, long march and i have just been waiting to get my seeds started. jambaloney built us a new seed starting tray as we haven't been able to get the greenhouse built yet. we'll still be on schedule...especially once the greenhouse is built! i can't wait for the rest of the snow to melt - it's been a tiny bit depressing this last few weeks. but spring is coming - i can smell it!!!! i'll do a post in the next day or two....ya know, the usual sky pics for Helga and the girls and food pics and cat pics for Winston and of course....seed pics!!!!! xox to all of you!)
Wednesday, March 27, 2013
Wednesday, March 13, 2013
hand tool restoration - part 4
jambaloney here!
hey helga - here is another sky pic for you!!!
here is the final tool post... this is what the mitre box for the saw in the first post looked like before vinegar..
it was pretty rusty and one of the pistons for the saw was rusted in place ..
here it is after the first vinager bath..
pretty ugly and dripping rust flakes...
as i planned on putting it back in the bath, i took it outside for cleaning #1...
snow is an excellent abrasive ;-)
look at the rust!!!
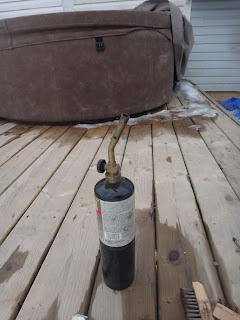
i had to get that stuck piston out without damage... the mitre box is useless without it - so using a blow torch...
wd-40 and a bolt to hammer it out - mission accomplished!!!
nice clouds!!
after another vinager bath, some progress is being made!!
and the bolts were loose enough that i could remove the plates..
to soak separately a third time...
back in they go with the last of the tools...
a hand auger and bits, a punch, crimper, chisel...
here are the plates all clean and oiled...
and the last of the tools!!!
i cleaned the frame for the mitre box, but i haven't haven't put it back together yet. i plan on a post about sharpening saws and will include a pic of the final product then.
the sun sets on the hand tool restoration posts, hope you enjoyed!!
cheers all!
Sunday, March 3, 2013
hand tool restoration - part 3
jambaloney here with part 3 of the tool restoration....
here is a sky pic for you helga - i took this on another trip to sydney at the end of cannes point road - if you look carefully, you can see the lighthouse at the mouth of fourchu harbor:
back to the tools - here are 2 files and 2 ball peen hammers fresh out of the vinager bath...
i scrubbed the hammer heads with steel wool and wd-40, but i took wire brushed to the files first....
after brushing the rusty files, i wiped them then sprayed them with wd-40 and then wrapped them in paper towel to get as much rust out of the grooves as i could..
everything gets a nice coat of mineral oil... i wrapped the files in paper towel again so that the grooves would get a light coat of oil but not get gummed up...
next up, 3 more files - 2 of these are free rat-tail files - huzzah! more wire brushing..
more wd-40, i spared you another mineral oil pic ;-)
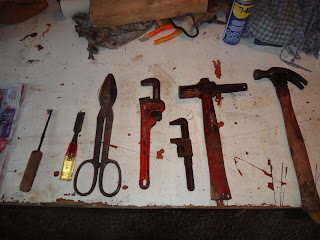
tin snips, chisels and pipe wrenches (and a weird hammer i have yet to determine the purpose of) ...
the tin snips are top-notch new jersey made..
stunning when cleaned - THAT is great steel!!!
tiny pipe wrench isn't too shabby either... a ye olde english tool!
before final clean-up...
during final clean-up...
and after - these are now ready to rock!
as are these!!!
i hope you enjoyed this part of the tool-fest... one more installment and i am done and on to something new!! in the meantime enjoy this pic of gabarus bay...
and a few fishing boats!!!
cheers all!!!
Subscribe to:
Posts (Atom)


